Host 8kit in Your Own Server
Deploy 8kit on your own infrastructure for complete control, security, and customization. This guide covers everything from installation to production deployment.
Install 8kit Server (Docker Compose)
The easiest way to deploy 8kit is using Docker Compose. This method handles all dependencies and provides a production-ready setup.
Prerequisites
Before you begin, ensure you have:
- n8n: A running n8n instance (required to use 8kit)
- Docker: Version 20.10 or higher
- Docker Compose: Version 2.0 or higher
- Minimum 2GB RAM available
- 10GB free disk space
- Port 6789 available (or configure custom port)
Since 8kit always runs in Docker, the server URL depends on how n8n is deployed:
- n8n locally + 8kit in Docker: Use
http://host.docker.internal:6789 - n8n in Docker + 8kit in Docker (same network): Use
http://8kit:6789 - n8n in Docker + 8kit in Docker (different networks): Use
http://8kit-container-ip:6789
See Docker Desktop networking documentation for more information.
Step 1: Create Docker Compose File
Create a new directory for your 8kit installation:
mkdir 8kit-server
cd 8kit-server
Create a docker-compose.yml file with the following configuration:
services:
  db:
    image: postgres:16-alpine
    container_name: 8kit-postgres
    environment:
      - POSTGRES_DB=service_db
      - POSTGRES_USER=postgres
      - POSTGRES_PASSWORD=postgres
      - POSTGRES_INITDB_ARGS=--auth-host=scram-sha-256 --auth-local=trust
    healthcheck:
      test: ["CMD-SHELL", "pg_isready -U postgres -d service_db"]
      interval: 5s
      timeout: 3s
      retries: 20
    restart: unless-stopped
    volumes:
      - 8kit_data:/var/lib/postgresql/data

  app:
    image: 8kit/8kit:latest
    container_name: 8kit
    ports:
      - "6789:3000"
    environment:
      - DATABASE_URL=postgresql://postgres:postgres@db:5432/service_db?schema=public
      # - JWT_SECRET=your-custom-minimum-32-char-secret
      # - SUPER_ADMIN_EMAIL=demo@8kit.io
      # - SUPER_ADMIN_PASSWORD=demo12345
      # - LOG_LEVEL=error
      # - JWT_EXPIRES_IN=7d
      # - MAX_REQUEST_SIZE=100kb
    depends_on:
      db:
        condition: service_healthy
    restart: unless-stopped
    healthcheck:
      test: ["CMD", "/health-check.sh"]
      interval: 30s
      timeout: 3s
      start_period: 40s
      retries: 3

volumes:
  8kit_data:
Step 2: Start the Services
Launch 8kit using Docker Compose:
docker-compose up -d
This will:
- Pull the required Docker images
- Start PostgreSQL database
- Start the 8kit API server
- Start the admin dashboard
- Configure networking between services

Step 4: Verify Installation
Check that all services are running:
docker-compose ps
You should see both services with "Up" status:
Name                Command               State           Ports
8kit                /health-check.sh     Up      0.0.0.0:6789->3000/tcp
8kit-postgres       docker-entrypoint.sh Up      5432/tcp
Test the API endpoint:
curl http://localhost:6789/health
Expected response:
{
  "status": "healthy",
  "timestamp": "2024-01-15T10:30:00.000Z",
  "version": "1.0.0"
}
Check the logs to ensure everything started correctly:
docker-compose logs 8kit
You should see logs indicating successful database connection and service startup.
Install 8kit Node
Now that your 8kit server is running, install the 8kit Node in your n8n instance.
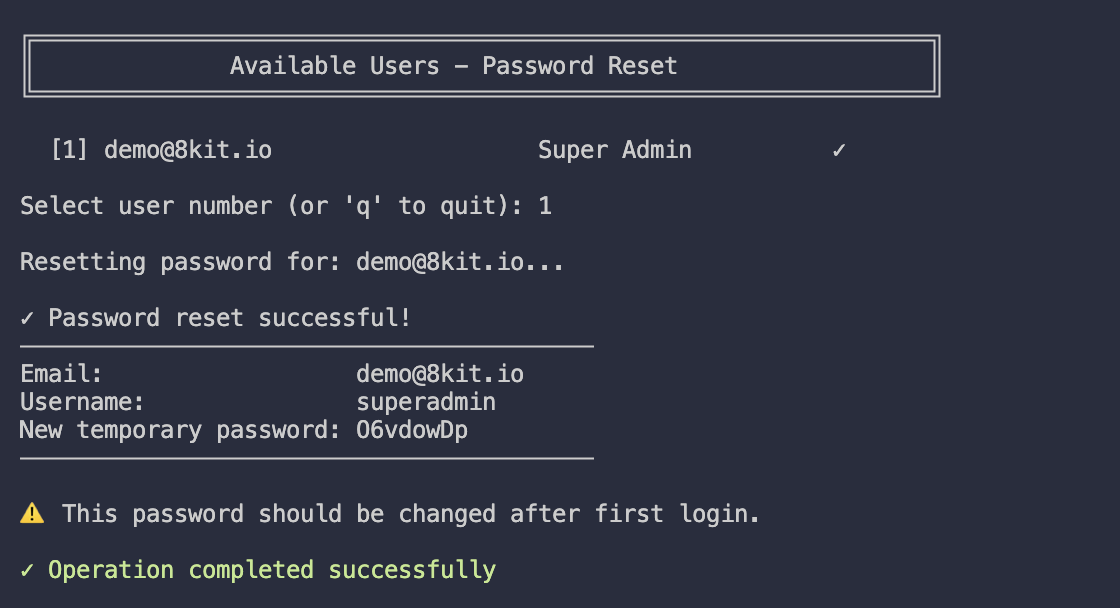
Resetting User Passwords
If you need to reset a user password on your self-hosted 8kit instance, connect to your server and run the helper script inside the 8kit container:
- Run the password reset utility:
docker exec -it <your_8kit_container_name> ./reset-password.sh
- Follow the prompts to reset the password.
Step 1: Install the Node
- Open your n8n instance
- Navigate to Settings → Community Nodes
- Search for "8kit" or use package name:
n8n-nodes-8kit - Click Install
Video Guide: Installing 8kit Node
Step 2: Configure the Connection
- Add the 8kit Node to your workflow
- Configure the connection:
- Server URL: Choose based on your n8n setup:
- n8n locally + 8kit in Docker:
http://host.docker.internal:6789 - n8n in Docker + 8kit in Docker (same network):
http://8kit:6789 - n8n in Docker + 8kit in Docker (different networks):
http://8kit-container-ip:6789 - Different servers:
http://your-server-ip:6789
- n8n locally + 8kit in Docker:
- API Key: Go to your 8kit dashboard, navigate to the Tokens page, and generate a new API key
- Server URL: Choose based on your n8n setup:
- Test the connection to ensure it works

Video Guide: Connecting to 8kit
Step 3: Test Your Setup
Create a simple test workflow:
- Add an 8kit Node (Uniqs action)
- Set the operation to "Add to Set"
- Add a test value like "test-item-123"
- Execute the workflow
- Check the response and verify in the admin dashboard

Next Steps
Now that you have 8kit running on your own server:
- Learn the patterns: Explore 8kit Patterns
- Build workflows: Create reliable n8n workflows
- Monitor performance: Use the admin dashboard
- Scale as needed: Add more resources or instances
Ready to dive into the patterns? Let's explore 8kit Patterns!